 WOWOW Faucets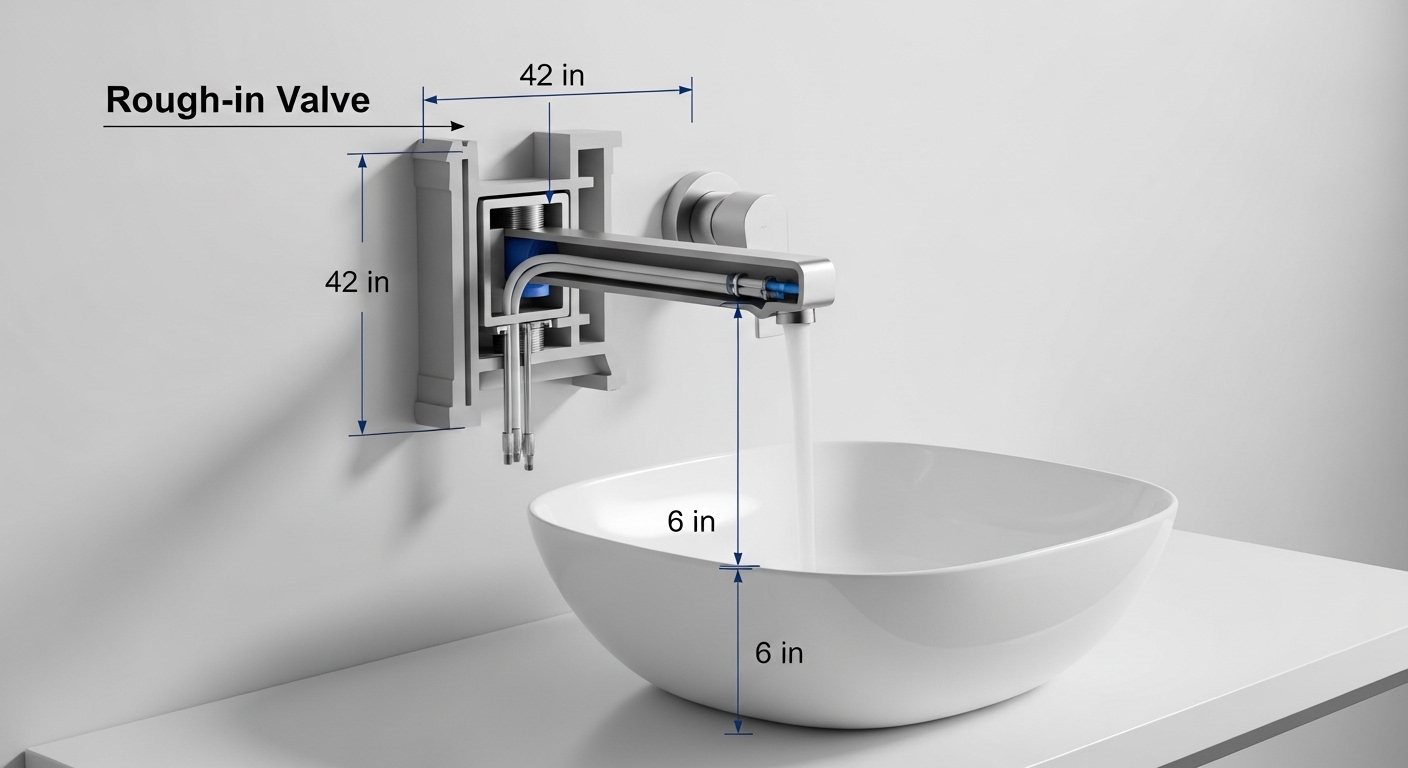
Getting the wall mounted faucet elevation right is the single decision that makes or breaks a wall-mount install, because unlike a deck faucet you can’t just swap it to a different hole — the spout height is baked into the wall before the tile ever goes up. Set it too low and the spout collides with a tall vessel bowl or splashes over the front edge; set it too high and water free-falls, splatters, and soaks the countertop every time you wash your hands. This guide walks through the exact numbers, the measure-from-the-water rule the pros use, and how to plan your rough-in so the finished faucet lands where it should.
We’ll answer the real questions people ask before they cut into a wall: how high above the sink the spout should be, where to rough in the valve, how vessel sinks change the math, and how to avoid the splash-back and reach problems that show up only after the tile is set.
How high above the sink should a wall mounted faucet be?
Aim for the spout outlet to sit 4 to 6 inches above the point where the water lands — the sink rim for a vessel bowl, or the drain/basin floor for a shallow undermount. That gap is the sweet spot: high enough to fit your hands under comfortably, low enough that the stream doesn’t turn into a splash bomb.
Here’s why 4–6 inches works. A faucet stream picks up speed as it falls, and the higher the drop, the more energy it carries when it hits the water or the porcelain — which is exactly what flings droplets back onto your shirt and the wall. Keep the fall short and the aerator does its job, delivering a soft, controlled column of water. Go much below 4 inches and you lose hand clearance, especially for filling a cup or scrubbing a pan in a kitchen application. Go above 6 or 7 inches over an open sink and you invite splash-back.
The catch with wall-mount faucets specifically: the “height above the sink” and the “height you rough in the valve” are two different numbers separated by the length of the spout’s downward reach. You plan for the finished spout position first, then work backward to the valve.
Where do you rough in a wall mounted faucet valve?
For a standard bathroom vanity with a vessel or undermount sink, rough in the valve body so the spout centerline ends up roughly 8 to 10 inches above the finished countertop, centered left-to-right over the sink drain. The exact number depends entirely on your spout’s shape, because the spout’s outlet drops down from the wall connection by a fixed distance.
Do this in three steps before you ever open the wall:
- Pick the actual faucet first. Wall-mount elevation is not a generic number — it’s derived from the spout you bought. Read the spec sheet for the vertical distance from the wall inlet to the water outlet.
- Set your target outlet height. Decide where you want the water to leave the spout: sink rim height + 4 to 6 inches for a vessel, or a bit lower for a shallow basin.
- Subtract to find the rough-in. Target outlet height minus the spout’s downward drop = the center height of the valve/inlet in the wall. Account for the thickness of your finished wall (tile + backer) so the escutcheon sits flush.
This “plan the finish, then subtract back to the rough-in” logic is the same discipline that makes shower valves land correctly, and it’s worth reading our full guide on walk in shower valve rough in height if you’re roughing in multiple fixtures on the same wall — the mistakes and the fixes rhyme.
| Sink type | Typical rim height above counter | Target spout outlet above rim/basin | Common valve rough-in (above finished counter) |
|---|---|---|---|
| Tall vessel bowl (5–6 in) | 5–6 in | 4–5 in above rim | 10–12 in |
| Short vessel bowl (3–4 in) | 3–4 in | 4–6 in above rim | 9–11 in |
| Undermount basin | 0 in (below counter) | 5–7 in above counter | 7–9 in |
| Semi-recessed / drop-in | 2–3 in | 4–6 in above rim | 8–10 in |
| Kitchen wall-mount over deep sink | varies (deep basin) | 8–10 in of clearance | 10–14 in |
Treat these as starting points, not gospel — your specific spout’s reach and drop can shift every number by an inch or two. Always dry-fit against the real faucet and the real sink before you commit.
Why does spout reach matter as much as height?
Because elevation only works if the water lands over the drain, and that’s controlled by the spout’s horizontal reach — how far it projects out from the wall. A perfectly-heighted faucet that dumps water onto the back rim instead of the drain is still a failed install.
The rule: the spout outlet should sit over — or just short of — the drain, so the stream falls into the deepest part of the bowl. Two things throw people off here:
- Sink depth front-to-back. A wide vessel bowl pushes the drain farther from the wall, so you need a longer-reach spout. A narrow basin needs a shorter reach or the water overshoots into the front of the bowl.
- Vanity depth and backsplash. A thick countertop or a chunky vessel sitting far forward changes where “over the drain” actually is. Measure from your finished wall to the real drain location, not from a catalog picture.
When you shop, match reach and drop together. A spout with generous reach but a short drop wants a slightly higher rough-in; a short-reach spout with a long downward drop wants a lower one. The two dimensions trade off, and the faucet’s spec sheet gives you both.
What faucet elevation works best for a vessel sink?
For a vessel sink, set the spout outlet 4 to 5 inches above the top rim of the bowl, then rough in the valve high enough to clear the whole vessel plus that gap. Tall bowls are the number-one reason wall-mount faucets end up too low — people plan around the counter and forget the bowl adds 5 or 6 inches of height before the water even starts.
Do the math with the bowl in place. If your vessel is 6 inches tall and you want a 4-inch clearance above the rim, the water needs to leave the spout at 10 inches above the counter. If the spout drops 3 inches from its wall inlet, your valve centerline roughs in around 13 inches above the finished counter. That’s meaningfully higher than a faucet feeding an undermount, which is exactly why “one height fits all” advice fails.
One more vessel-specific tip: check the horizontal clearance between the spout outlet and the front lip of the bowl. You want to be able to slip your hands in and rinse without knuckling the porcelain. Wall-mount faucets shine here because they free up the whole rim of the vessel — but only if the elevation and reach are dialed in. If you’re weighing a wall-mount against a tall deck faucet for a single-hole counter, our breakdown of the best single hole sink faucet kitchen setup covers the trade-offs of going deck-mounted instead.
Does wall mounted faucet elevation change for a kitchen sink?
Yes — kitchen wall-mount faucets ride much higher because you’re clearing deep basins and tall stockpots, not just washing hands. Plan for 8 to 10 inches of clearance between the spout outlet and the bottom of the sink, which often puts the valve rough-in 10 to 14 inches above the counter depending on basin depth.
The logic flips slightly in a kitchen. In a bathroom you’re fighting splash-back, so you keep the drop short. In a kitchen you’re fighting clearance — you need room to fit a Dutch oven or a sheet pan under the stream — so you accept a taller elevation and rely on a good aerator to tame the splash. Deep farmhouse and apron sinks push the clearance requirement even higher.
Wall-mount kitchen faucets also let you position the spout exactly where the plumbing can reach, which sometimes means running supply lines through an exterior or interior wall. If your rough-in involves tight turns behind the wall, a fitting like a copper tap elbow can redirect the supply cleanly to the valve inlets without kinking the line — worth planning before the drywall closes up.
How do you avoid splash-back with a wall mounted faucet?
Splash-back comes from too much elevation, a hard stream, or water hitting a flat surface at a bad angle — fix it by keeping the drop in the 4–6 inch range, using an aerated spout, and aiming the outlet at the deepest part of the bowl rather than the flat back or a shallow shelf.
Concrete moves that kill splash:
- Lower the elevation an inch. If you’re already tiled in and can’t move the valve, some spouts let you swap to a longer-drop design that shortens the effective fall.
- Keep the aerator. An aerator mixes air into the stream so it lands soft. A laminar or aerated flow at a sensible flow rate splashes far less than a raw, high-pressure jet.
- Aim over the drain. Water falling into standing water or the sloped bottom of a bowl absorbs its energy; water hitting a flat rim shelf sprays everywhere.
- Match flow to the basin. A shallow vessel with a high flow rate will always splash more than a deep basin. Consider a moderate flow rate spout for tight, shallow bowls.
If you inherit an existing wall-mount that splashes and you can’t move it, the cheapest fixes are almost always the aerator and the aim, not a demolition. Clean or replace the aerator first — mineral buildup turns a soft stream into a spitting one, especially in hard-water areas.
What tools and measurements do you need before you commit?
Before you open the wall, you need the faucet’s spec sheet, a tape measure, a level, and the actual sink on site — decisions made from memory or a catalog photo are how elevations end up an inch off. Here’s the pre-install checklist:
- Finished counter height — measure from the floor to the top of the finished vanity.
- Sink rim height — how far the bowl rim sits above the counter (0 for undermount).
- Drain location — distance from the finished wall to the center of the drain.
- Spout drop — vertical distance from wall inlet to water outlet, from the spec sheet.
- Spout reach — horizontal projection from the wall.
- Finished wall thickness — tile + backer, so the escutcheon and valve depth are right.
Dry-fit everything. Hold the faucet against the wall at your planned height, set the sink in place, and eyeball where the water would fall. Ten minutes of dry-fitting saves a tiled-in mistake you can’t undo without a demo bar.
Buying tips: which WOWOW wall mount faucet fits your sink?
Choose based on your sink type first, then confirm the spout’s reach and drop match your target elevation. A tall vessel wants a longer-reach, higher-mounted spout; a shallow undermount wants a shorter drop closer to the counter. WOWOW wall-mount spouts publish both reach and drop dimensions so you can run the subtraction math above before you buy — no guessing.
A few quick buying pointers so the wall mounted faucet elevation lands right on the first try:
- Confirm the spout’s outlet-to-inlet drop against your target clearance number.
- Match finish to your other fixtures — a wall-mount is a focal point, so brushed, matte black, or brushed gold reads intentional.
- Check the valve type and whether the rough-in body is sold with the trim or separately, so you can rough in early.
- Verify the reach clears your bowl’s front lip for comfortable hand access.
If you’re still torn between a bold finish and a classic look for a bathroom vanity, our guide to the Victorian centerset faucet is a helpful contrast for deciding how much of a statement you want the faucet to make.
FAQ
How high above a vessel sink should the faucet spout be?
Set the spout outlet 4 to 5 inches above the top rim of the vessel bowl. Because a vessel adds several inches of its own height on top of the counter, this usually means roughing in the valve 10 to 13 inches above the finished countertop — measure with the actual bowl in place.
What is the standard rough-in height for a wall mounted bathroom faucet?
There’s no single universal number because it depends on your spout’s drop and your sink, but a common range is 8 to 10 inches above the finished counter for undermount and drop-in sinks, and higher for tall vessels. Always derive it from your specific faucet’s spec sheet by subtracting the spout drop from your target outlet height.
Why does my wall mounted faucet splash so much?
Almost always because the elevation is too high, the aerator is clogged or missing, or the stream is hitting a flat surface instead of the drain. Lower the effective drop toward 4–6 inches, clean or replace the aerator, and aim the outlet over the deepest part of the bowl.
Can I install a wall mounted faucet on an existing sink?
You can, but only if you can open the wall to run supply lines and mount the valve at the correct elevation for that sink. Retrofitting is more involved than a deck faucet swap because the plumbing lives inside the wall — plan the rough-in height and reach before cutting, since you can’t easily move it later.
Does a kitchen wall mount faucet need to be higher than a bathroom one?
Yes. Kitchen wall-mounts sit higher to clear deep basins and tall cookware, typically leaving 8 to 10 inches between the spout and the sink bottom, whereas a bathroom faucet keeps a shorter 4–6 inch drop to minimize splash while washing hands.
How do I center the spout over the drain?
Measure the horizontal distance from your finished wall to the center of the drain, then match a spout whose reach lands the outlet over that point. If the drain sits far from the wall (common with wide vessels), you need a longer-reach spout; a short basin needs a shorter reach so water doesn’t overshoot.
About the author: This guide was written by the WOWOW Faucet product team, drawing on years of hands-on installs and customer support cases across vessel, undermount, and kitchen wall-mount setups. WOWOW designs and tests bathroom and kitchen fixtures built to cUPC and NSF/ANSI standards, with ceramic-disc cartridges rated for hundreds of thousands of cycles and finishes covered by our limited lifetime warranty. We stand behind every faucet we ship — if your elevation or fit isn’t right, our support team helps you make it right.
\n
Related Guides
\n
- \n
- What Is The Standard Height Of A Shower Head
- What is the Standard Height for a Sink?
- How Do You Do a Shower Valve Installation with PEX the Right Way?
\n
\n
\n
\n