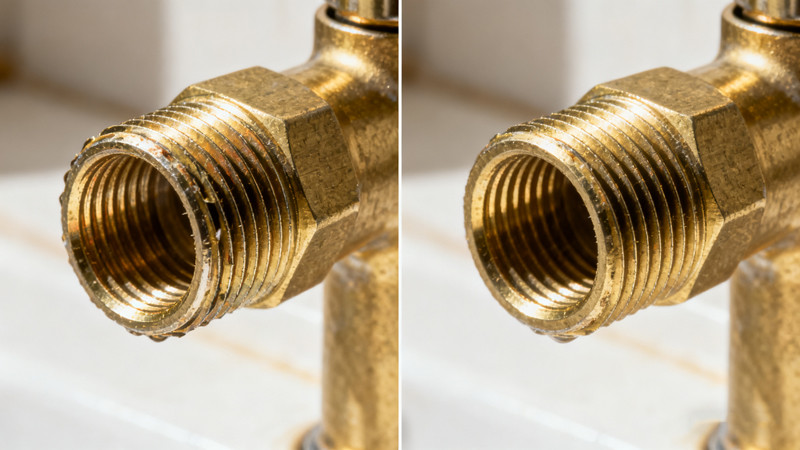
Installing or repairing a faucet should be a straightforward task. But sometimes, when tightening a fitting, you might notice resistance, hear grinding, or see that the threads don’t align properly. This problem is called cross-threading—when the threads of two parts (like a faucet fitting and pipe) don’t screw together correctly.
Cross-threaded fittings can cause leaks, damage parts permanently, and even make your faucet unusable if left unresolved. Fortunately, with the right steps and tools, you can fix the issue and prevent it from happening again. This guide will walk you through how to identify cross-threading, repair it, and avoid it in the future.
What Is Cross-Threading?
Cross-threading happens when two threaded parts are forced together at the wrong angle. Instead of aligning smoothly, the threads cut across each other. In plumbing, this often occurs with faucet connections, supply lines, or pipe fittings.
Signs of cross-threading include:
- Difficulty turning the fitting by hand
- Grinding or squeaking as you tighten
- Visible misalignment between parts
- Damaged, flattened, or stripped threads
- Persistent leaks even after tightening
Ignoring these signs can make the damage worse and require costly part replacements.
Step 1: Stop and Assess
The first rule of fixing a cross-threaded faucet fitting is don’t keep tightening. Forcing the connection will strip the threads completely and make repairs more complicated.
- Stop turning the fitting immediately if you feel resistance.
- Loosen and disconnect the parts carefully.
- Inspect both sets of threads (on the faucet and the connector) under good light.
If the damage is minor, you can often repair it yourself. If the threads are severely stripped or cracked, replacement may be the only option.
Step 2: Clean the Threads
Dirt, debris, or corrosion can sometimes make cross-threading worse. Before attempting a repair:
- Wipe the threads with a clean cloth.
- Use a soft brush or an old toothbrush to remove buildup.
- For stubborn corrosion or mineral deposits, apply a vinegar solution and gently scrub.
A clean surface makes it easier to see the true condition of the threads.
Step 3: Realign the Threads
If the threads are only slightly cross-threaded, you may be able to realign them:
- Hold both parts straight and in line with each other.
- Insert the fitting gently and rotate it counterclockwise until you feel a small “click” or drop. This is the point where the first threads align.
- Slowly begin turning clockwise by hand. The fitting should screw in smoothly with little resistance.
Never use tools like wrenches until you’re sure the connection is threading correctly by hand.
Step 4: Repair Damaged Threads
If you notice burrs, flattened sections, or rough edges on the threads, you’ll need to repair them. Depending on the severity, here are some options:
- Thread file: A small tool designed to reshape damaged threads. Run it carefully along the grooves to restore the shape.
- Tap and die set: For more serious cross-threading, a tap (for internal threads) or die (for external threads) can re-cut the threads to their original form.
- Thread chaser: A simpler tool than a tap/die, useful for cleaning up slightly damaged threads without cutting new ones.
Take your time with this step—rushing can remove too much material and weaken the connection.
Step 5: Use Thread Sealant
Once the threads are realigned or repaired, applying a sealant helps prevent leaks and protects the connection:
- Plumber’s tape (Teflon tape): Wrap it around male threads 2–3 times, moving clockwise.
- Pipe dope (thread sealant compound): Brush a thin layer onto the threads for a tighter seal.
These materials won’t fix severely damaged threads but can help secure a proper connection once alignment is restored.
Step 6: Reassemble Carefully
When reconnecting the fitting:
- Hand-tighten first to ensure proper alignment.
- Once hand-tight, use a wrench or pliers to snug it up, but avoid overtightening.
- Turn on the water supply and check for leaks.
If the fitting still won’t tighten properly or continues leaking, the threads may be too damaged and replacement is the best option.
When to Replace Parts
Sometimes, fixing isn’t practical. You should replace the fitting if:
- Threads are stripped beyond repair
- Cracks are visible on the connector or faucet
- Leaks persist after multiple repair attempts
- The cost of tools exceeds the price of replacement
Replacement is often the most reliable long-term solution, especially for inexpensive supply lines or connectors.
How to Prevent Cross-Threading in the Future
While fixing a cross-threaded fitting is possible, prevention saves time and hassle. Here are some tips:
- Always start by hand: Turn fittings by hand for the first few rotations to ensure proper alignment.
- Keep threads clean: Wipe away dirt, debris, and old sealant before connecting.
- Don’t rush: Take time to line up the parts evenly before tightening.
- Use proper tools: Avoid overtightening with wrenches, which can misalign threads.
- Check alignment: If the fitting resists or feels off, back it out and try again.
A little patience during installation can prevent hours of repair work later.
Final Thoughts
Cross-threaded faucet fittings are a common but avoidable plumbing issue. By recognizing the signs early, stopping before damage worsens, and carefully realigning or repairing the threads, you can often fix the problem yourself. For minor damage, tools like thread files or sealants work well. For severe cases, replacement may be the smarter choice.
Above all, prevention is key. Always start by hand, work slowly, and keep threads clean to ensure smooth, leak-free connections. With these habits, your faucet fittings will last longer and give you fewer headaches.
 WOWOW Faucets


